Saturday, 26 July 2014

How to Install Android in Windows using VMware (Part- 2 Installing Android)

This is the Second and the last Part of our article 'How to Install Android in Windows using VMware'. The Part-1 of this tutorial if very important (The tutorial on Configuring Android in VMware).

If you have completed the Part- 1 successfully then read the tutorial below to install android in Windows and if not then click here to read the first Part of this article.

NOTE: To get out of Virtual Machine windows press Alt+Ctrl button. (You will need this Key combination whenever you open a virtual machine).

Installing Android in Windows: 

  1. Open the virtual machine window and Select 'Power On this virtual machine'. VMware will now power on this virtual machine and take you to the installation mode (See image below). Here you can select how you want to Run android. We will select the last option which says ' Installation - Install Android-x86 to hard disk' because we want to Install android.
     
    Install Android in Windows using Virtual Machine, VMware Workstation, VirtualBox, VMware Payer

  2. Now wait for some seconds and then you will see a 'Choose Partition' dialog box. Highlight 'Create/Modify Partitions' and hit Enter.
       
    Install Android in Windows using Virtual Machine, VMware Workstation, VirtualBox, VMware Payer

  3. [This is the most important step and it should be done carefully]
    Then you will a new window as shown in image below. First highlight 'New' and hit Enter then select 'Primary' and hit Enter twice.
    Now Select 'Write' and then it will ask you to write data, just type 'yes' and hit Enter. Then wait for some time while the data is being written.
     
    Install Android in Windows using Virtual Machine, VMware Workstation, VirtualBox, VMware Payer

    Install Android in Windows using Virtual Machine, VMware Workstation, VirtualBox, VMware Payer

  4. Once the process is complete select 'Quit' and then you will be taken back to 'choose partition' window. Now select the newly made partition named:
    'sda1  linux       VMware Virtual-I'
     

    Install Android in Windows using Virtual Machine, VMware Workstation, VirtualBox, VMware Payer
       
  5. In next window you have to choose file system. Select 'ext3', hit Enter and then select 'Yes' to format virtual machine primary partition. Then it will ask you to Install GRUB Bootloader, click 'Yes'. and then again click 'Yes' again when prompted.
     

    Install Android in Windows using Virtual Machine, VMware Workstation, VirtualBox, VMware Payer
     
  6. After that it will start installing android in virtual machine. Don't worry if you see a blue screen for some time after the installation is complete.

    Install Android in Windows using Virtual Machine, VMware Workstation, VirtualBox, VMware Payer
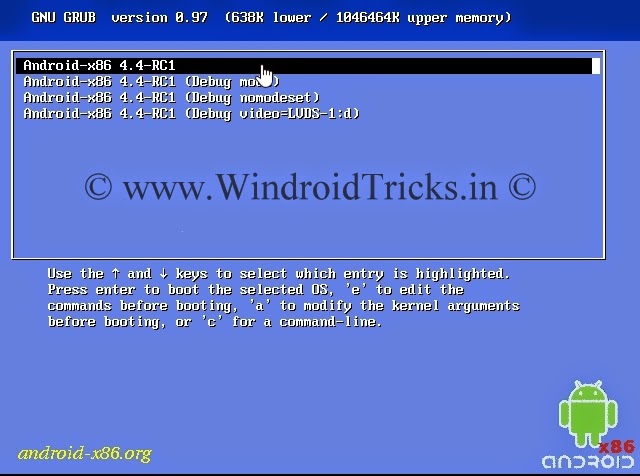
  7. Now select 'Reboot' and your Android will reboot to GRUB Bootloader, select the First option to boot into android system.

    Install Android in Windows using Virtual Machine, VMware Workstation, VirtualBox, VMware Payer
     
    Install Android in Windows using Virtual Machine, VMware Workstation, VirtualBox, VMware Payer
  8. The first boot will take some time. Once the boot process is complete select your preferred language and complete the initial setup. It is not necessary to add your Gmail ID in Virtual Machine.
     
  9. After completing initial setup you will be taken to your Android's home screen. Now you can experience Android in windows pc.

    Install Android in Windows using Virtual Machine, VMware Workstation, VirtualBox, VMware Payer
NOTE: Some of the apps like Camera, Messaging will not work in virtual machine.
If you have any other questions then you can comment below. 

How to Install Android in Windows using VMware (Part- 1 Configuring Android)

Android and Windows are two of the most popular OS(Operating System) now-a-days. Every PC runs on Windows OS and almost every touch screen device have Android installed in it. But all of the High End Android devices are very costly.

So what if you want to try the latest android version but don't want to buy a costly android device that runs the newest version of android? Well you can download and install Android inside Windows using VMware or any other virtual machine manager. And have the experience of a High End Android Smartphone by using the maximum power of your computer.
People who don't have an Android device but want to try Android to know how it looks and feels will definitely find this article useful.
I have divided this tutorial in two parts Part- 1 for configuring Android in Virtual Machine and Part- 2 for Installing and Running Android in Virtual Machine. This is because I have written everything in detail and if I merge both the tutorial then it will become very lengthy and hard to understand. So I hope you will find this tutorial useful and Let's start with the things you will need to run android in Windows.

Things You Will Need: 

NOTE: You can also use VMware Player which is free for home use. Get it here

Tutorial:

The tutorial is same for all the above virtual machine managers. In the tutorial below I am going to use VMware Workstation.
  1. Download and Install VMware Workstation in your computer.
     
  2. Open VMware Workstation and select 'Create a New Virtual Machine' and then a dialog box will appear. Select 'Typical (recommended)' installation method and click 'Next'.
     
    How to install android in Windows using Virtual Machine, VMware Workstation, VirtualBox
     
  3. In Next Windows, select 'Installer disk Image File(iso)' and browse to the android version you installed. VMware Workstation will automatically detect it as 'FreeBSD'. Once this is done, click Next.

    How to install android in Windows using Virtual Machine, VMware Workstation, VirtualBox

  4. Give this virtual machine a name and hit 'Next'. I named it 'Android 4.4' because I am installing the latest Android Kitkat.
     
    How to install android in Windows using Virtual Machine, VMware Workstation, VirtualBox
      
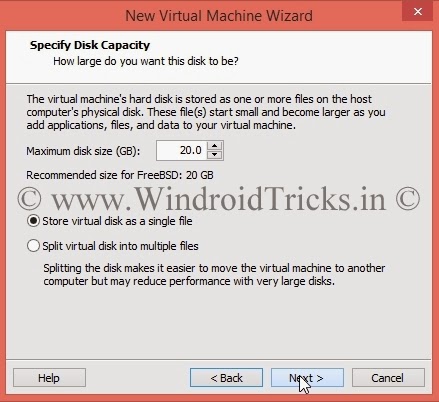
  5. In next window you will have to give your Android a maximum disk space which will be used as Internal Memory. The recommended size is 20GB but you can change it as per your needs.
    One more thing you have to change here is how to save your Virtual disk. I suggest you to select 'Store virtual disk as single file' because this is good for performance. Click Next once this is done.

    How to install android in Windows using Virtual Machine, VMware Workstation, VirtualBox
     
  6. Click 'Customize Hardware...' button and a new dialog box will open. You have to make following changes here:
    Memory - Minimum 1GB or Half of your Installed RAM (recommended by us)
    Processors - Depends on your hardware but at least make it 2
    Don't make any other changes here and hit 'Close' button.

    Also Uncheck 'Power on this virtual machine after creation' and hit 'Finish' to finish the configuration.

    How to install android in Windows using Virtual Machine, VMware Workstation, VirtualBox

  7. Once the configuration is complete you will see a new window in VMware. (See image below)
     
    How to install android in Windows using Virtual Machine, VMware Workstation, VirtualBox

  8. The configuration process is now complete. To change settings for this virtual machine select 'Edit virtual machine settings'.
The first part of this tutorial is now completed. In next part we will be installing and running Android in Virtual Machine.
Part- 2 Installing and Running Android in Virtual Machine
If you have any questions related to above tutorial then you can comment below.  

Thursday, 24 July 2014

Create Unlimited number of Folders in One click

This is another random fun trick shared by us. In this trick we are going to make a batch file (.bat file) that will create tons of new folders in just a second. 

This is a safe trick and not a virus. You can run it on your own computer but make sure to run it on an empty folder. Otherwise your important files and these new folders will get mixed. So lets start with the tutorial.

Tutorial:

  1. Open notepad and type the code given below in notepad screen.
    Code:
    @echo off
    :make
    md %random%
    goto make
    Make Unlimited folders using notepad
      
  2. Now Click on File > Save As and save the file file as 'anything.bat'. Remember that '.bat' is important and the name can be anything like 'MakeFolder.bat' (that we used).
      
    make unlimited folders using notepad
     
  3. To check if the file is working or not, create a new folder (Press Ctrl + Shift + N) on your desktop or anywhere you want. Copy the file that you created above and double click on it to run.
     
  4. A command prompt window will open and it will start making new folder giving them named randomly.
     
    Make unlimited folders using notepad

How to stop this file:

Stopping this file is very easy below I have given two ways to stop this file.
    
  1. Just press the close ( ) button on top right corner of command prompt and it will stop instantly.
     
  2. Press Ctrl + C and then type Y and hit Enter. Command window will close instantly.
NOTE: Run this batch file on an empty folder otherwise your disk will be flooded with unwanted folders. This file creates more than 1000 folders in just a second. 
If you need any help or have any questions in mind then you can comment below.

Tuesday, 22 July 2014

Get ₹ 50 Free Recharge using WeChat [Official Offer]

WeChat is an instant messaging app just like WhatsApp but with tons of new features. This is the first time (as far as we know) WeChat decided to give their users a surprise gift. WeChat Team have decided to give free recharge of ₹ 50 to all its users.

Get Free Recharge of 50 Rs. using WeChat Android App
   
This is a limited period offer and will last only two days. The offer was started on 22 July 2014 (8:00 am) and will end on 24 July 2014 (at 8:00 pm). So guys hurry up and don't miss this chance to get free recharge.

Update: The Offer has ended. Click Here to View More Offers

How to get free recharge:

Also Read: Earn Free Recharge by Downloading Android Apps from Play Store
  1. Download WeChat app from Play Store. (Click here to download for other OS)
     
     
  2. Register for a new account or login to your old account.
     
  3. [For New Users] Activate and Confirm your account using mobile.
     
  4. Send any message to one of your WeChat friend.
     
  5. In next 4 hours, you will receive a recharge link from WeChat team.
     
  6. Click on Link and fill the required information.
     
  7. Click on submit and you will get your free recharge shortly.
     

Image Proof: 

50 Rs. Free Recharge using WeChat APP
Message sent to my WeChat ID by WeChat Team.

Get free recharge from WeChat
Message sent to my mobile via WeChat Team (Today @ 4:03PM)
So that's all.. Hope you guys will get your free recharges. If you are having problem using WeChat App or have any questions in mind then you can comment below.

Sunday, 20 July 2014

How to download torrent using IDM or any other Download Manager

Torrent is the biggest file hosting site. You can download anything from torrents for free. A lot of users ask me how they can download torrent files using Internet Download Manager (IDM), so I decided to write a tutorial on this topic.
NOTE: We (WindroidTricks.in) don't support downloading files from torrent because these files can contain malwares and spywares that can potentially harm your computer. 
Zbigz is a website that helps you download torrent files without using a torrent client. The website first uploads the file on their own servers(takes about 5 minutes to upload 1GB data) and then you can download the file normally.

Tutorial:

  1. Go to your favorite torrent hosting website and select the file you want to download.
     
  2. Copy the torrent download link or download '.torrent' file in your pc.

                           How to download torrent using IDM or any other Download Manager

  3. Go to ZbigZ.com or click here and paste the link you copied or upload the '.torrent' file.

                           How to download torrent using IDM or any other Download Manager
     
  4. Select 'FREE' or 'PREMIUM'.
    FREE(Unregistered users) can only download files less than 1GB and with a maximum speed of 150 KBps.
    PREMIUM(Paid) users have no limits regarding speed and size.        

                        How to download torrent using IDM or any other Download Manager

  5. Now ZbigZ will start catching the file to their servers (This speed does not depend on your connection).
     
                        How to download torrent using IDM or any other Download Manager
     
  6. Once the file catching is completed you can click on Download button and your file will start downloading.
     
    How to download torrent using IDM or any other Download Manager
If you need any help related to this tutorial then you can comment below.

Friday, 18 July 2014

What is Soft Brick and Hard Brick

Soft Brick and Hard Brick are two of the most used terms in Android rooting and flashing. Bricking your phone means that you can't use your android phone any more and it's kind of dead.
 
What is Soft Brick and Hard Brick | Android
Image Source: unbrick.itcse.com
Bricking of Android phone is further classified into two parts. First is Soft Brick and Second is Hard Brick.
But what is Soft Brick and Hard Brick? Just  read below and you'll find out.

Soft Brick:

Soft Brick is the state when you can't boot your android phone to home screen and it keeps looping either in Recovery or in boot logo. This usually happens when you flash a wrong or bugged file that is not made for your device.

How to Solve? 
Soft Brick is very easy to solve if you made a backup before flashing or making any changes in your android phone. But don't worry if you don't have a backup you can solve this problem easily by flashing the official firmware of your device.

Hard Brick:

This is a nightmare for most of the android users. In this your state your device is completely dead and it is very hard to solve it. At this stage when you try to boot your phone it do nothing, you can't even see bootlogo and can't go to Download Mode or recovery mode. This usually happens when you flash custom roms or mods that are not made for your device.

How to solve?
To solve this problem you have to force your device to download mode and then flash the stock firmware using pc. You can use a USB Jig to force your phone to download mode(Samsung Users) or use JTAG Brick Repair.

If you have any more questions regarding this topic or want to add something in this topic then comment below.